이것은 며칠간 했던 닭질의 정리 차원에서 쓰는 글
flutter 앱에서 FCM 처리하는 예제는 참 많지만, firebase_messaging 버전이 낮거나, 필요한 기능들을 고려하지 않은 것이 대부분이라 고생 좀 했다.
필요해서 구현한 기능은 다음과 같다.
- android, iOS에서 모두 수신 가능(당연히)하고 동일하게 동작해야 한다.
- 앱이 foreground에 있을 때 heads-up notification 노출되어야 함
- 앱이 background에 있거나 종료 상태라도 수신 가능해야 하고 heads-up notification 노출되어야 함(잠김 상태가 아닐 때)
- 안드로이드 status bar 에 알림 아이콘이 정상적으로 표시되어야 함.
Firebase Console 설정이나 인증서 발급 같은 부분은 잘 설명되어 있는 문서가 많으니 넘어가고, 새 flutter 프로젝트를 만드는 것부터 시작한다.
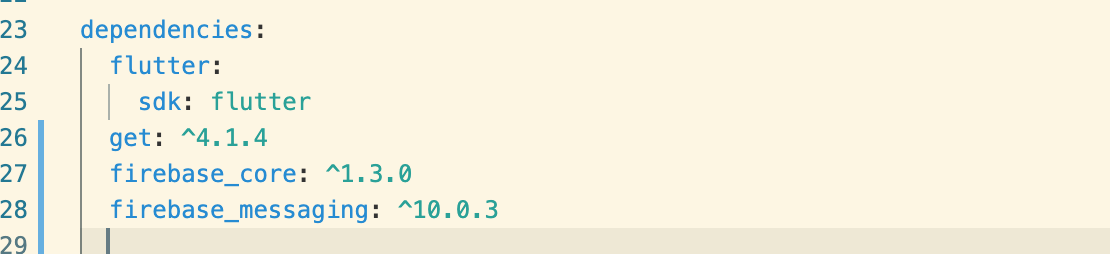
아, 이 글에서 사용하는 패키지는 모두 2021년 7월 기준 최신 버전으로 하고, 상태 관리는 GetX를 이용한다.
- Flutter: 2.2.3
- firebase_core: ^1.3.0
- firebase_messaging: ^10.0.3
- get: ^4.1.4
- flutter_local_notifications: ^6.0.0
1. 새 flutter 프로젝트 생성
보통은 VisualStudioCode에서 만드는데, 이번에는 콘솔에서 생성해본다.
> flutter create notification_sample
> cd notification_sample
> git init
> code .
2. Notification 처리하기 전 기본 뼈대 만들기
1) pubspec.yaml에 GetX 패키지를 추가하고,
2) 컨트롤러(lib/controllersapp/app_controller.dart)를 만들고
3) lib/main.dart 을 고쳐준다.
1) pubspec.yaml

2) 컨트롤러 파일 생성 (lib/controllers/app_controller.dart)
import 'package:get/get.dart';

class AppController extends GetxController {
  static AppController get to => Get.find();

  Future<bool> initialize() async {
    return true;
  }
}
3) main.dart 수정
import 'package:flutter/material.dart';
import 'package:get/get.dart';

import 'controllers/app_controller.dart';

void main() {
  runApp(MyApp());
}

class MyApp extends StatelessWidget {
  MyApp({Key? key}) : super(key: key);
  final AppController c = Get.put(AppController());

  @override
  Widget build(BuildContext context) {
    return GetMaterialApp(
      home: Scaffold(
        appBar: AppBar(),
        body: FutureBuilder(
          future: c.initialize(), // 여기서 앱 실행 전에 해야 하는 초기화 진행
          builder: (context, snapshot) {
            if (snapshot.hasData && snapshot.connectionState == ConnectionState.done) {
              return Center(
                  child: Column(
                mainAxisAlignment: MainAxisAlignment.center,
                children: [
                  Text('title', style: TextStyle(fontSize: 20)),
                  Text('message', style: TextStyle(fontSize: 15)),
                ],
              ));
            } else if (snapshot.hasError) {
              return Center(child: Text('failed to initialize'));
            } else {
              return Center(child: Text('initializing...'));
            }
          },
        ),
      ),
    );
  }
}
여기까지 앞으로 테스트할 앱의 뼈대를 만들었다.
다음으로 일단 기본적인 Notification 메시지를 한번 받아보자.
3. Notification 수신
앞에서 말했듯이 firebase에 프로젝트 설정하고 구글 서비스 ID를 받아오는 것은 여기서 다루지 않는다.
안드로이드용 google-services.json 파일과 iOS용 GoogleService-info.plist 파일을 잘 다운로드했다고 가정하고 진행한다.
몇 가지 주의해야할 것은 다음과 같다.
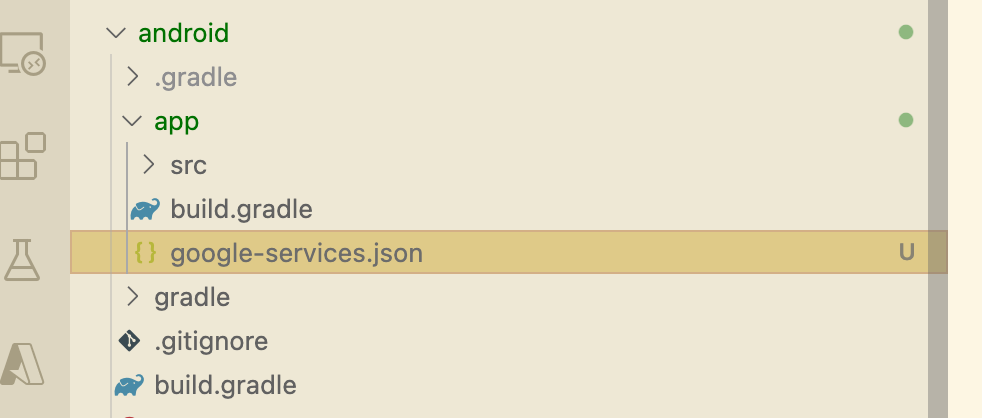
1) google-services.json 파일의 위치는 android/app/google-services.json
2) GoogleService-info.plist 파일의 위치는 ios/Runner/GoogleService-info.plist 이다. 단, iOS의 경우에는 파일 복사 후에 꼭 xcode에서 해당 위치에 추가해줘야 한다.

기본적인 Notification 수신은 FlutterFire 문서(https://firebase.flutter.dev/docs/messaging/overview)에 잘 나와 있으니 크게 어렵지는 않다.
pubspec.yaml에 firebase_core, firebase_messaging 을 추가해주는 것은 기본이고,
3.1. 안드로이드 설정
안드로이드 프로젝트에는 build.gradle이 2개 있어서 항상 헷갈리는데, 하나는 프로젝트 범위(android/build.gradle), 다른 하나는 App 범위(android/app/build.gradle)이다.
이 두 개의 파일을 모두 수정해줘야 하는데, 일단 프로젝트 build.gradle은 dependencies 부분에
classpath 'com.google.gms:google-services:4.3.3'
를 넣어준다.

그리고 app build.gradle에는
apply plugin: 'com.google.gms.google-services'
을 추가해준다.

나의 경우에는 minSdkVersion 이 21 미만인 경우에는 multidex 도 enable 해줘야 할 수 있다.
3.2. iOS 설정
FlutterFire 문서(https://firebase.flutter.dev/docs/messaging/apple-integration)에 나온 대로 xcode에서 GoogleService-Info.plist 파일 추가하고, 필요한 설정을 해주면
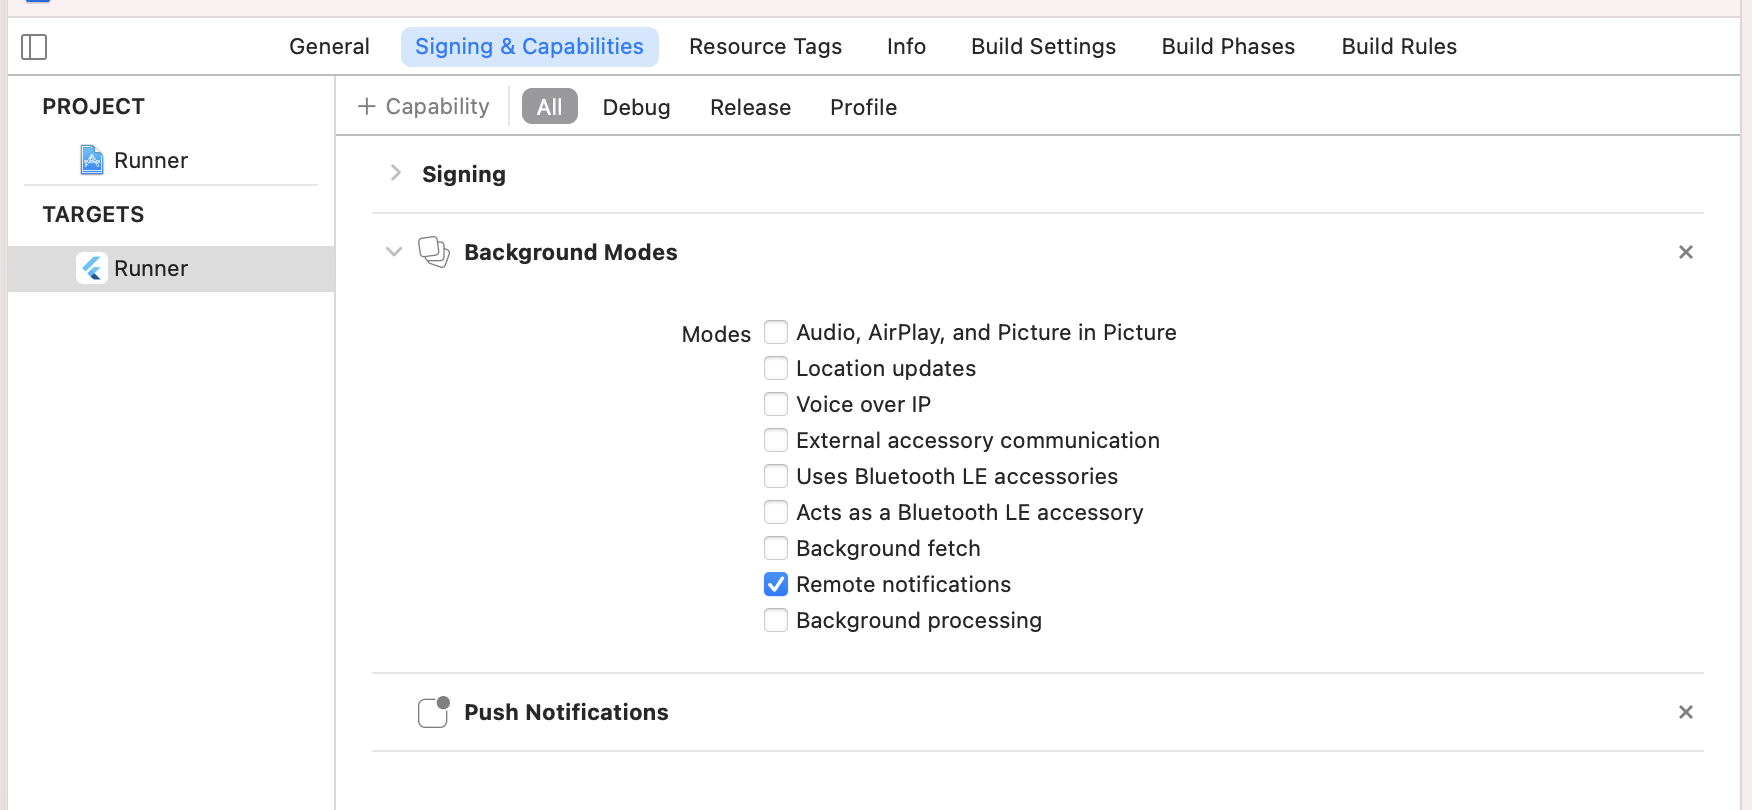
iOS에서도 Notification을 수신할 수 있다.
단, firebase messasging 최신 버전은 iOS 타겟을 10.0 으로 해줘야 빌드가 된다.
ios/Podfile 의 platform 라인의 주석을 제거하고 10.0으로 수정해준다.
# Uncomment this line to define a global platform for your project
platform :ios, '10.0'
이제 ios 디렉토리에서 pod install 한번 해주면 iPhone에 설치를 할 수 있을 것이다. 혹시 Visual Studio Code에서 빌드가 안 되면 xcode에서 한번 해본다. 문제가 무엇인지 에러 메세지를 확인할 수도 있고, xcode에서 한번 빌드&설치해보면 그 이후에 VSCode에서 잘 될 수도 있다.
> cd ios
> pod install
3.3. 기본 코드
app_controller.dart 에서 firebase messaging 을 초기화하면 기본 메시지는 수신할 수 있다.
// app_controller.dart

import 'package:firebase_core/firebase_core.dart';
import 'package:firebase_messaging/firebase_messaging.dart';
import 'package:get/get.dart';

class AppController extends GetxController {
  static AppController get to => Get.find();

  final Rxn<RemoteMessage> message = Rxn<RemoteMessage>();

  Future<bool> initialize() async {
    // Firebase 초기화부터 해야 FirebaseMessaging 를 사용할 수 있다.
    await Firebase.initializeApp();

    // Android 에서는 별도의 확인 없이 리턴되지만, requestPermission()을 호출하지 않으면 수신되지 않는다.
    await FirebaseMessaging.instance.requestPermission(
      alert: true,
      announcement: true,
      badge: true,
      carPlay: true,
      criticalAlert: true,
      provisional: true,
      sound: true,
    );

    FirebaseMessaging.onMessage.listen((RemoteMessage rm) {
      message.value = rm;
    });

    return true;
  }
}
수신된 메시지를 화면에 표시하기 위해 main.dart의 Column을 조금 수정해준다.
          builder: (context, snapshot) {
            if (snapshot.hasData && snapshot.connectionState == ConnectionState.done) {
              return Center(
                  child: Obx(() => Column(
                        mainAxisAlignment: MainAxisAlignment.center,
                        children: [
                          Text(c.message.value?.notification?.title ?? 'title', style: TextStyle(fontSize: 20)),
                          Text(c.message.value?.notification?.body ?? 'message', style: TextStyle(fontSize: 15)),
                        ],
                      )));
            } else if (snapshot.hasError) {
              return Center(child: Text('failed to initialize'));
            } else {
              return Center(child: Text('initializing...'));
            }
          },
일단은 notification 부분의 title, body 를 화면에 보여주도록 했다.
이렇게 해놓고, Firebase Console 에서 테스트 메시지를 보내본다.
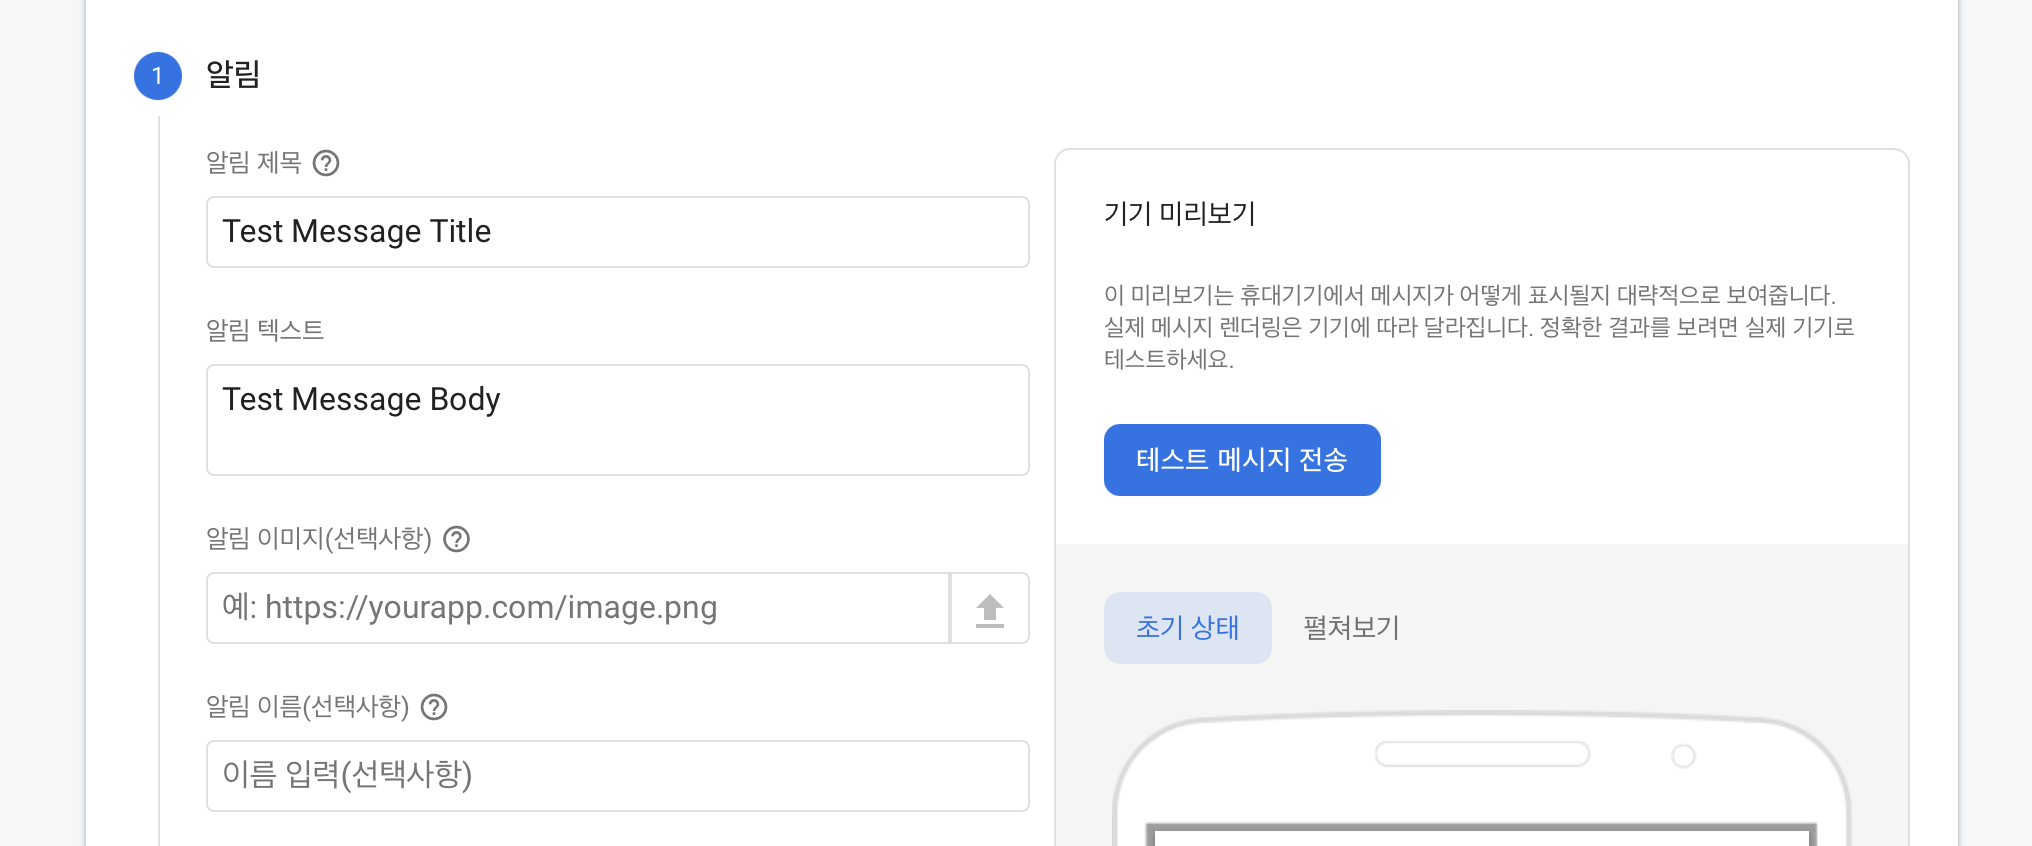

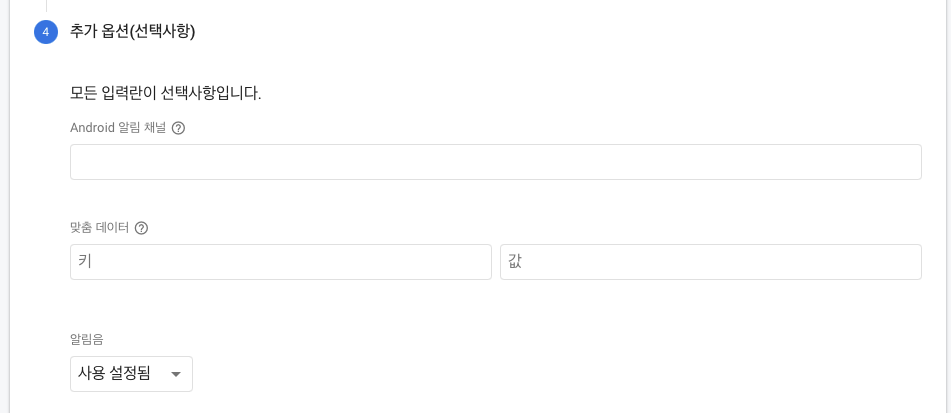
Firebase console에서 메시지 테스트하는 경우 추가 옵션에서 알림음 사용 설정해야 iOS에서 기본 수신음이 동작한다.
소스는 github에 올려놓기는 했는데, google-services.json 과 GoogleService-info.plist 추가하는 것을 잊지 않는다.
https://github.com/nicejhkim/flutter_fcm_sample
여기까지 하면 다음과 같이 동작한다. (폰마다 다를 수 있음)
1) 안드로이드 foreground: 소리, 알림 팝업 없이 수신됨 (메인화면 Text Widget에만 반영됨)
2) 안드로이드 background: 소리는 나고 알림 팝업은 뜨지 않음. Notification 서랍에는 들어감
3) 안드로이드 terminated: 소리는 나고 알림 팝업은 뜨지 않음. Notification 서랍에는 들어감
4) iOS foreground: 소리, 알림 팝업 없이 수신됨 (메인화면 Text Widget에만 반영됨)
5) iOS background: 소리와 함께 기본 알림 팝업 뜸
6) iOS terminated: 소리와 함께 기본 알림 팝업 뜸
앞으로 위의 문제들을 하나씩 해결해보자. 다음과 같은 순서로 정리를 할 예정이다.
- heads-up notification (Android/ iOS)
- Android Notification icon


